Saturday, November 12, 2011

HESTON BLUMENTHAL'S RESTAURANT AT THE MANDARIN ORIENTAL HOTEL, IN HYDE PARK, LONDON - 'DINNER'.

'DINNER' is the name of Heston Blumenthal's new restaurant in Hyde Park, London. In the past, the main meal - 'dinner' - was eaten at midday, whilst it was still light outside. But candles and, later, gaslight saw 'dinner' shift to later times. People working in the cities were taking a 'lunch' to work and having their main meal - dinner - at 5.00 pm when they got home. But even today, depending where you are in the British Isles, 'dinner' might still be served at lunchtime, but suppertime is the more preferable.

Ashley Palmer-Watts joined Heston Blumenthal at The 'Fat Duck' in Bray in 1999 when it had just received its first Michelin star. Within two years, he was promoted to Sous Chef and he became Head Chef in 2003. Since 2008, he has been the Executive Head Chef for the Fat Duck group. Ashley currently heads up the kitchen at 'DINNER' - Fig 1.


Fig 1 - the 'Dinner' restaurant with the 'pineapple logo' - the idea behind this is explained later on.


Aviva, James and I had a late sitting at 9.30pm. Walking in to the restaurant, you were immediately struck by the design of the whole space. You walked through 'wine storage areas' that were temperature controlled depending on the type of wine. Then you stepped into an 'open planned' room, that had partial walls to reduce the level of the noise. There was an 'open' kitchen' behind glass walls, and a 'chefs table' next door to the kitchen. In the 'open kitchen' the main courses are made; but there are two kitchens hidden in which cold things are prepared. There is also another kitchen downstairs where all the preparation is done. The waiting staff at 'dinner' were truly excellent, friendly and an absolute wealth of information about the 'dinner' menu.

We were seated at the table - Fig 2, on which was already placed the 'dinner' menu - Fig 3.


Fig 2 - Aviva, Barry and James at the 'dinner' table


Fig 3 - the 'starters' on the 'dinner' menu


We then had the opportunity to peruse the menu, which has its basis, cooking wise, from the 1300's onwards. Boston sourdough bread was served that was just delicious. Then the three of us chose different 'starters' - Figs 4a and b, 5 and 6.


Fig 4a - Aviva chose 'Meat Fruit' (c. 1500) which is mandarin jelly coated chicken liver parfait and grilled bread. The mandarin jelly tastes, and is real mandarin


Fig 4b - the mandarin split open to reveal the chicken parfait


Fig 5 - Barry had 'Savoury Porridge' (c. 1660) which consisted of snails cooked sous vide, girolles, garlic and fennel - it was absolutely delicious


Fig 6 - James had 'Rice and Flesh' (c. 1390) which consisted of saffron, calf tail and red wine - truly scrumptious!


Then we had the main course - Figs 6 and 7


Fig 6 - Aviva and James had different varieties of steak. The steak was cooked sous vide and was absolutely tender and extremely tasty. These steaks were served with mushroon ketchup, red wine juice and the famous Heston Blumenthal triple cooked chips


Fig 7 - Barry had Powdered Duck Breat (c. 1670) which was a piece of duck breast cooked sous vide with smoked confit fennel and umbles (liver, kidney and other portions of the inside of venison and other animals)


And then we shared two desserts - Fig 8 - Tipsy Cake (c. 1810) and Fig 9 - Taffety Tart (c. 1660)


Fig 8 - Tipsy Cake is pineapple brioche with split roasted pineapple. Hence the 'pineapple' as the logo for this restaurant


Fig 9 - Tafferty Tart with apple, rose, fennel and blackcurrant sorbet


The Sommeliars are expert in their choice of wine, and whilst we only had a few glasses of wine - it was really terrific wine that we chose.

The meal finished with a small shot glass of mint chocolate ganache, which was super.

So that was the ending to a fabulous dinner at 'dinner'. Bookings are at a premium, but if you happen to be in London - then try and go to 'DINNER' - it is fantastic and one worth the fabulous experience!

Thursday, November 10, 2011

THE CULINARY INSTITUTE OF AMERICA

I had the marvelous opportunity whilst visiting my brother - David and sister-in-law - Lauren - who live in upstate New York to go and visit the Culinary Institute of America - New York campus. The Culinary Institute of America has three campuses - one in New York; one in Texas and the other in California.
The Culinary Institute of America is located in Poughkeepsie - about 50 miles north of New York city. It is in a really beautiful location on the banks of the Hudson River. The Culinary Institute of America started off as being a Seminary for priests, who at a later stage sold most of the land to the Culinary Institute of America. So the Institute has some old buildings but some very new ones as well.


Fig 1a - The Culinary Institute of America


Fig 1b - the symbol of the Culinary Institute of America within the floor of the main building.


We arrived at the Culinary Institute of America just in time for lunch. There are four restaurants run entirely by the students of the Institute - the Ristorante Caterina de' Medici restaurant; the American Bounty restaurant; the Escoffier restaurant and the Apple Pie Bakery Cafe. We went to the Medici restaurant which is of course Italian. The restaurant is entirely conducted by students - both the chefs and the waiting staff. The Medici restaurant - Fig 2


Fig 2 - Ristorante Caterina de' Medici


has quite a comprehensive menu Figs 3,4


Fig 3 - my brother David, my sister in law Lauren, and myself in the Ristorante Caterina de' Medici


Fig 4 - Lauren perusing the menu


and I ordered Bresaola with olive oil and Grana Padano; Potato gnocchi with beef ragu; and finally three mixed sorbets. I specifically ordered the gnocchi dish because I felt that being an Italian restaurant - the gnocchi should be extra special! Well they were special but not extra special - I imagine that it takes some time to get the gnocci to that 'mouth watering' level! Everything was served neatly and correctly, and full marks to the waiters and their instructors. You couldn't help but notice that some of the waiters and waitresses were a little nervous, but that added to the overall charm of the restaurant. There was a note on the menu to engage the waiting staff in conversation - and this we certainly did. And it was marvellous what we found out. One stunning factor was the cost of attending the Institute, which amounted to quite a sum of money. It was not surprising, therefore, that two members of our waiting team, had taken some time off 'mid course', to get a job and earn more money.
After lunch was complete, we went for a walk around the immediate area Figs 5,6,7,8,


Fig 5 - Lauren and Barry infront of the main building


Fig 6 - the fountain opposite the main building


Fig 7 - the education center


Fig 8 - walkway up to the main entrance


and then went on a tour of the various kitchens in which the students were taught. One of the kitchens was at the back of the Apple Pie Bakery Cafe where we saw the trainee chefs putting the final touches to some desserts. And the next kitchen we went to was the 'bulk kitchen' where most of the meals for the staff and students was cooked. It really looked like a 'production line' and I suppose - considering the large number of people attending the Institute, it would really have to be like that. The next kitchen we went to see was the bread making kitchen - Fig 9.


Fig 9 - a view into the bread making kitchen


The students working here are on 'night shift' where they start at about 10pm and work through the night to get fresh bread ready for the morning rush. They make a variety of different types of bread with an enormous variety of different seeds and grains. The next kitchen we visited was the cake making kitchen where students had to be precise and were weighing out the different constituents in preparation for their baking. They were making cakes, biscuits and brownies, and we were permitted to taste a coconut macaroon that some of the students made.

Interesting, the students are given an exercise where they are required to make the same tasting food in three different ways - one using a normal technique; one using gluten free techniques; and one using techniques for specific allergies to a particular product. This is extremely important considering that a significant number of the population are either gluten free or allergic to some particular product.

One thing that I noticed that was not readily apparent, was the almost complete absence of molecular gastronomy teaching, products or techniques. Being one who is very interested in molecular gastronomy techniques - it's absence was a little disappointing.
And finally the tour took us to all the four restaurants previously mentioned Fig 10,


Fig 10 - the outside of the the American Bounty restaurant


where the aim behind each of the restaurants was fully explained.

Really a thoroughly delightful day in an absolutely beautiful location.

Sunday, July 10, 2011

WHICH KITCHEN KNIFE DO I BUY?

Which kitchen knife do I buy?

This post was brought about as a result of my daughter and son in law asking me for the name of a good set of knives to buy. And after pondering about it for some time -I consider it a very useful and important topic to write about.

You see - a knife should in a way be an extension of your hand, except your 'hand' has a a sharp cutting edge. As such it must be extremely comfortable to handle and should not unduely weigh your hand down, so that with minimal use, your hand gets tired. The balance of the knife in your hand must be near perfect, otherwise you are not going to get the ultimate out of your knife. So perusing the knife departments of the kitchen ware stores, or looking 'on line' one sees about 50 different knife brands, and each knife brand has as many as 130 different knives Everten

Now many of these knives are formulated for different specific circumstances, like cutting tomatoes; slicing smoked salmon; cutting fish and meat; etc., but there are also a whole range of general purpose knives such as the 'cooks knife' - Fig 1.


Fig 1 - two types of 'cooks knives' - a 'Furi' knife on top and a 'Wusthof Trident' knife on the bottom.


And I ask myself 'why is this so'. And the answer is very simple. In order to acheive the parameters mentioned above, and considering that there are so many 'grips' and so many different sized hands - that must be part if not all the reason why there are so many cooks knives. So that would mean, that if say a woman and her partner are doing equal shares of the cooking - you would, theoretically, require two different knives.

So then - which knife do you choose? And the answer to this question is quite simple. The person who is buying the knife for her/himself has to go into the kitcheneware store and actually handle the knife and see whether it fullfills all the parameters mentioned above eg: balance. So, for example, a person doing most of the cooking may find that a 'Global' knife suits them best as a cooks knife; a 'F.Dick' knife is well balanced for cutting bread; a 'Wusthof Trident' knife is best for boning out fish; etc.

So what I am getting at is that 'sets of knives' look great in a block in your kitchen, but it is quite rare for a single person to use ALL the knives in the block. Sure a 'knife block' may be cheaper to buy, but if you are cooking seriously, a range of differing brands will give you the ultimate feel when using knives.

I personally use a Furi knife as my cooks knife - Fig 2,


Fig 2 - a 'Furi' cooks knife on the top; a 'Furi' general cutting knife in the centre; and a 'Furi' vegetable knife at the bottom.


but use a Japanese branded knife for cutting sushi - Fig 3;


Fig 3 - a sushi knife.


a small 'Global' knife for cutting cores out of vegetables; a 'Wusthof Trident' knive for deboning fish; and a 'Kruger' knife for deboning meat - Fig 4;


Fig 4 - a 'Wusthof Trident' knife for cutting fish and a 'Kruger' Knife for cutting and de boning meat.


and a 'F. Dick' scalloped knife for cutting bread with - Fig 5.


Fig 5 - a 'F.Dick' scalloped knife for cutting bread.


But as I was saying before - just as there are so many cutting tasks to do - there are an equal number of different knives to do it with!

So if you are going shopping for a knife/knives - go to a kitchen store; try out the knives (perhaps more than once) and only then will you have a good idea of which knife suits you best!

And just a word on the sharpening of knives. I think that I can say that ALL knives need sharpening. A quick sharpening before each time you use a knife makes the cutting with the knife so much easier. Either you can learn how to sharpen the knife yourself using a 'steel' or a ceramic sharpener, or all good kitchen stores have a knife sharpening service. You will be very wise to avail yourself of this - it will make use of the knife so much easier.

Tuesday, June 14, 2011

SMOKING OF FOOD

SMOKING OF FOOD

Smoking of foodstuffs has been a cooking technique that I, personally, have not tried before, and yet the basic smoking of food is relatively easy, and has, in fact been done for hundreds of years – all that it requires is a container that can be heated up, a smoking mixture and a receptacle for holding the food to be smoked, that can be tightly closed.


I bought a metal steamer, filled it partially with the smoking mixture - Smoking Foods , and smoked my meat – and it was absolutely marvellous. You have to decide whether you are going to ‘hot’ smoke the food or ‘cold’ smoke the food – I chose initially to hot smoke the food, and the results were stunning.


So this is what I did.


Fig 1 - a metal steamer.


I bought a metal steamer (Fig 1) from the Asian store, but there are many other utensils that can be used going from the very simple (like I did) to the more complicated smokers that can be bought commercially - Misty Gully .
I initially chose to smoke using an 'Oolong tea' smoking mixture, which consisted of long grain rice, oil, sugar, spices and some Oolong tea (Fig 2).


Fig 2 - the long grain rice plus sugar, tea and spices in the base of the steamer.


But the range of substances that can be used is enormous. If you desire to give a ‘wood’ smoke flavour to the food, then apple wood (Fig 3),


Fig 3 - apple wood chips from Misty Gully.


hickory and other woods can be used. One must ensure that the wood is free from insecticides, the wood is in a fine chip form, and the wood is completely wet before smoking is begun.

I chose initially to smoke quail meat Fig 4. Quail is not a thick meat and therefore the amount of time that it is smoked is relatively short.


Fig 4 - quail prior to deboning.


What I did was to butterfly and then debone the quail (Fig 5),


Fig 5 - the quail deboned.


marinate it in a pepper, salt, mandarin and ginger mixture (Fig 6),


Fig 6 - quail marinated in pepper,salt, ginger and mandarin peel.


and then after about one hour, clean off the marinating mixture (Fig 7),


Fig 7 - the marinating mixture washed off, the quail dryed and placed in the steamer.


and smoke it (Fig 8,9,10,11). The smoking mixture was placed in the base of the steamer; the heat was turned on and I waited till I began to see some steam coming off the smoking mixture. I then placed the container with the meat on top of the smoking mixture containing base, put on the lid, and the smoking was done for a period of 5 minutes and the smoking continued with the flame turned off for a further 5 minutes – at the end of this time – the meat had a distinct but subtle Oolong tea flavour to it.


Fig 8 - once smoke begins to emerge from the steamer, the lid is placed on, and the heat is continued for another 5 minutes.


Fig 9 - the steamer opened at the conclusion of 5 minutes with the heat on, and 5 minutes with the heat turned off.


Fig 10 - the quail taken out of the steamer.


Fig 11 - the quail meat divided into two ready for final frying and serving.


Fig 12 - final brief frying of the quail prior to serving.


Just before serving, I placed the meat in a hot frying pan for just one minute (Fig 12) to heat up and crisp the quail, and then the quail was eaten.

Possible health danger.

I suppose that one reason that 'held me back' from smoking food was the possibility of a health danger - after all, eating smoked food is akin to smoking a cigarette Ask the Experts: The dangers of barbecued meat . But on looking through some of the published literature on smoking food, it appears that long smoking with certain dry woods can give a slightly higher health risk than you would get from other cooking methods. From my own point of view - short hot smoking using materials other than wood for the smoking mixture, pose little danger of any health risk occuring. You can definitely find out more on this subject by reading the abundant articles on the internet.

Monday, September 13, 2010

MIXED BEAN AND POTATO SOUP

I have a easy bean soup to make!

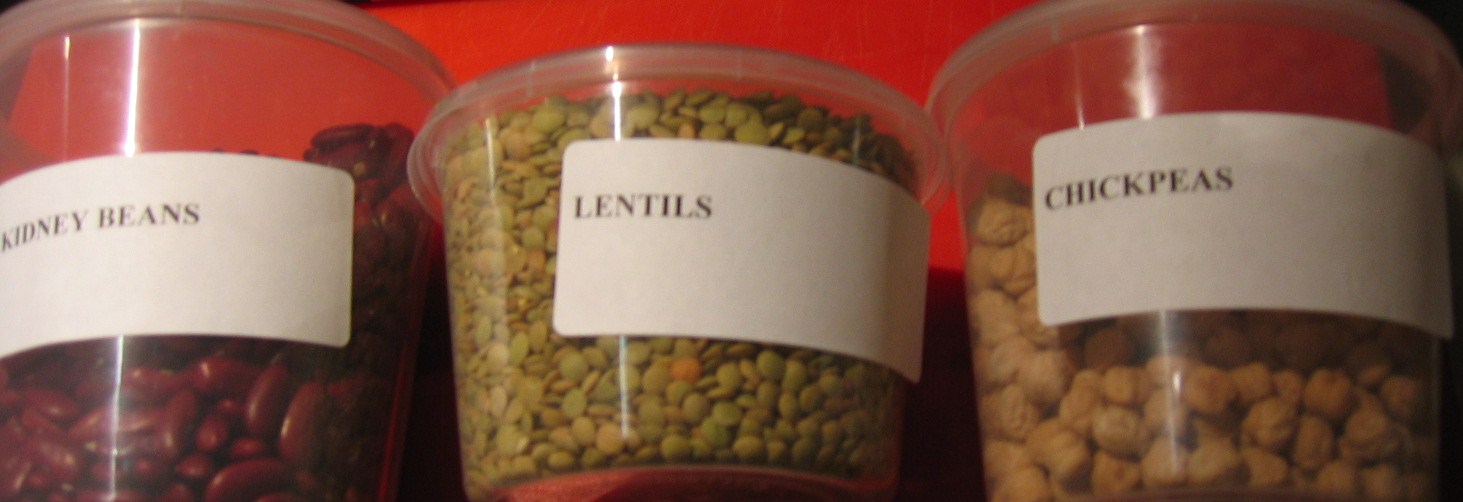
I decided to make a soup out of beans that I have hardly ever used before. So I went along to the Middle Eastern Store and bought Great Northern beans, red kidney beans, lentils, chickpeas and I noticed on the shelf some dried Lupini beans. I thought that they looked very interesting – much the same ‘looking’ as lima beans, or so I thought!

Well I soaked all the beans overnight, and the next day I began to make my soup. After adding all the requirements, I allowed the soup to simmer for about 1 ½ hours and then I tried it. It was the most sour horribly tasting soup that I’ve ever had. So I thought – what have I put in the soup that would make it so horribly tasting, and I finally honed this down to the Lupini beans - I better go to the internet, to find out more about Lupini beans.

Well I got a shock because I thought Lupini beans were the much the same as Lima beans. But Lupini beans have got alkaloids in them which are slightly poisonous, and when leached out make the water/soup completely sour. The thing you must do when preparing Lupini beans, is to change the bathing water every day, for about 5 days; boil up the beans; change the water again and then the Lupini beans become a very tasty addition to the menu! This ‘after the event’ knowledge on what to do with Lupini beans makes me wary that if I ever come across an ingredient that I don’t know what it is or does – I will always go the internet first and look up the ingredient!

For those of you that may be interested – there are in excess of 100 bean types that may be used in cooking – I bet that you have only come across perhaps a dozen of these types!

So, to get back to the recipe!

Ingredients:
Step 1
- Fig 1, Fig 2, Fig 3 and Fig 4
200 gm of chickpeas – soaked overnight
200 gm of red kidney beans – soaked overnight
200 gm of yellow lentils - soaked overnight


Fig 1 - red kidney beans; lentils; and chickpeas


Fig 2 - 200 gm each of the red kidney beans; the lentils and the chickpeas


Fig 3 - the beans are immesed in water and kept like this overnight


Fig 4 - engorged beans after an overnight soaking

Step 2
1 brown onion
3 potatoes - Fig 5; Fig 8
vegetable stock cube


Fig 5 - three potatoes are used


Preparation:
Step 1

The following day, the beans are brought to a boil over a low flame for about 30 minutes - this gets rid of the starch that comes out of these beans Fig 6.


Fig 6 - as the water boils, white starch like material comes to the surface which is skimmed off

Step 2
2 tablespoons of olive oil are then placed in a saucepan, and a finely chopped up onion is fried gently - Fig 7. Three potatoes that have been peeled and diced up roughly, together with the boiled beans, a vegetable stock cube and enough water to fully cover the contents of the saucepan - Fig 9. I then add some pepper and salt, and allow the mixture to slowly simmer for about 1 ½ hours, by which time all the beans are tender and the soup is ready to eat.


Fig 7 - the onion is gently fried in olive oil


Fig 8 - the diced potato is ready to add to the mixture


Fig 9 - all the ingredients and the water are added, and the mixture is left to slowly simmer for 1 1/2 hours


Fig 10 - the final soup ready in a bowl to eat - yum!

Presentation:
Two bowls of this yummy soup together with crusty bread makes a very nice meal!

Saturday, May 1, 2010

CARROT, LENTIL AND POTATO SOUP

Ingredients:
Step 1
½ cup of red lentils - Fig 1
Step 2
30 gms butter or oil
1 brown onion - Fig 1
Step 3
3 - 4 carrots - Fig 1
3 desiree potatoes - Fig 1
1 ½ liters water
vegetable stock cube
Salt and pepper
3 drops Tabasco sauce – optional


Fig 1 - the basic ingredients.


Preparation:
Step 1
Place the red lentils in water and wash them thoroughly to get rid of the grit and the starch.
Step 2
Place butter/oil in a saucepan over low heat and put in diced onion - Fig 2 and allow to cook till the onion is translucent.
Step 3
Peel the carrots - Fig 3 and dice them up and place them in the saucepan. Allow them to cook slowly for about 5 minutes. Peel the potatoes - Fig 4 and cut each into 8 pieces, and place in the saucepan. Drain the red lentils - Fig 5 and place them in the saucepan together with the vegetable stock cube - Fig 6; 1 ½ liters of water; the seasoning and the Tabasco sauce if using.


Fig 2 - onions cooking in the saucepan.


Fig 3 - carrots added to the saucepan.


Fig 4 - potatoes added to the saucepan.


Fig 5 - red lentils added to the saucepan.


Fig 6 - vegetable stock cube added to the saucepan.


Bring to the boil and allow to simmer for 25 minutes - Fig 7.


Fig 7 - soup simmering away in saucepan.


The soup can either be eaten the way it is or can be food processed for a smoother result - Fig 8.


Fig 8 - yummy processed soup!


Eaten together with a slice of crusty bread – it is terrific!